
I often find myself falling back on references to The Simpsons‘ early seasons when words fail me. In the case of Final Fantasy 14 and its latest Nier Automata crossover raid, it was Homer watching Twin Peaks on the couch. He observes a scene, laughs to himself about how “brilliant” it is before delivering the all-timer line – “I have absolutely no idea what’s going on”.
If you’ve been following my work on Final Fantasy 14 you’ll know I’m still something of a novice at the mammoth MMO/RPG hybrid. In my first player diary, I noted how the game slowly introduces you to its combat and systems, offering a tantalising taste of the complexity to come. Well, I got a proper taste of where I am headed with the game last week when playing through Reflections in Crystal‘s massive raid, The Puppets‘ Bunker.

Our mates at Square Enix were good enough to hook me up with a prebuilt character who was ready to take on Patch 5.3’s new Nier Automata raid content. So with my trusty Red Mage geared up to high heavansward and my senses mildly adjusted to the litany of spells at my disposal, I took part in one of the most confusing, wonderful online events of my short MMO life.
The Puppets’ Bunker Impressions
Following on the from the events of the first raid, The Copied Factory, players are hot on the trail of the treacherous 2P. You, and 23 other players, will need to plunge the depths of the Bunker, the home base ship from Nier Automata, which has cratered in a desolate desert. The vista that greets you upon joining the raid is gorgeous, with sleek techno ruins sprawling out that sets the stage for a thrilling showdown.
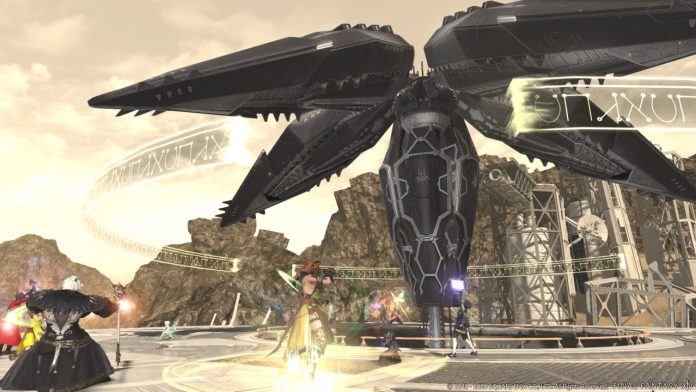
Not long after your Scooby gang is formed (players are split into three balanced squads), you’ll be dropped right into the raid’s first boss battle. The 813P Aegis Unit is a visually spectacular fight that sees squads positioned around its gigantic form on a perilous platform. The 813 utilises massive outbursts of energy to make all by the tiniest sliver of the platform safe to stand on at any given moment with death by long drop the price you pay for a foot wrong.
It’s a chaotic fight and the visual indicators for danger zones do occasionally get lost amid the storm of attack animations. The 813 itself is a behemoth piece of machinery that looks cool but lacks the flair of later bosses in the dungeon, though the sheer scope of the fight goes a long way to make up for it. Bunching up with your squad of the small safe zone and moving as a unit to avoid the countless AOE attacks coming your way is a blast.
With the 813 down you’ll be airlifted by Nier bots further down into the wreckage where the encounters start to get interesting. Landing on ground level triggers a three-way tussle with a group of light artillery units the size of a small house. These metal walker lads are not messing around and, unless interrupted, will cast devestating AOE attacks that can leave the party with a paralysis debuff or worse. Each squad has its own unit to deal with but keeping an eye on the state of the other two is advised to avoid synchronised sweeps.
Once the artillery units are taken care of the ground gives way as the whole group is sent tumbling into a pit. Fortunately, those lovely little flying bots will sweep in and whisk you off into the third arena where you’ll be dealing with suped-up versions of the artillery units. Only this time, they fly now. Each unit will tether a squad to itself, meaning you can’t help each other out this time and teamwork becomes a must. Given their aerial nature, they will often launch a barrage of missiles and tracking attacks, which hurt in a big way if hit (trust me).
The units will also start to work together to make life that much more complicated. These instances are a great example of Final Fantasy 14‘s clear visual language as you’ll need to pay attention to things like thruster directions to get an idea of where the attack will land. This is far more engaging than a standard glowing circle on the ground and the units synchronising is a good introduction to the complicated encounters soon to come.

From this point on the raid starts to really flex, showing off a wild variety of stages and boss fights. While the outer crash site was cool, once you get a chance to venture into the labyrinth halls of the Bunker, things start to get…strange. The Nier Automata visual reference points are utilised more liberally down here, starting you off with a slippery slide adventure through curved hallways, twisted by the crash.
Eventually you’ll find yourself in a new arena being overlooked by a giant projection screen and housing a scary looking turrett in the centre. This is maybe the most complex of the raid battles, with multiple stages, arena hazards and visual signifiers that require close attention. You’ll be up against a heavy artillery unit that can deal massive damage, manevour quite quickly and call upon the turret and pod support units for good measure.
It’s a lengthy encounter and I’m not too ashamed to admit that my squads healer was my best friend here. Dodging the bombs (large energy balls Nier Automata players will be intimately familar with) is easy enough but the support pods get very tricky, very quickly. Behind each pod is a screen of information that tells you what move each pod will make, with coorisponding numbers to different moves. It can be a lot, and was the only time the raid felt a little unfair, but was still a novel use of the setting.
The run to the final boss also uses the Bunker premise with mixed results. You’ll be tossed into a lengthy corridor with laser spamming units at the end, each one targeting a lane for you to avoid on the way through. It’s a cute nod to Nier Automata‘s shoot-em-up rails segments but if you’re downed on the way through it can be difficult for your team to grab you amid the chaos.
Still, any struggles along the way are worth it for the raid’s final boss, a body horror nightmare creation that ends things with a memorable bang. Catching up with 2P, who has now been taken down a peg by 2B, you’ll bear witness to an avalanche of formless white android bodies piling forth onto one another forming the first stage of the final boss. This giant orb of misshapen body parts and androids is known as the Compound and will dice up anyone caught in its variety of laser-based arena blasts.

This fight culminates with Compound 2P, a gigantic white android version of the strange antagonist and a fitting final note for the raid. It’s a bombastic, large scale fight that caps off a series of encounters that are mostly fantastic stuff. The cutscenes in between are fun if a little light on concrete plotting but my relative inexperience with large scale Final Fantasy 14 raids doesn’t give me much to compare it all to.
What I can say is that The Puppets’ Bunker is an aesthetic delight. Lifting elements from Nier Automata in both visuals and soundtrack, it’s a thrilling ride through the game’s bleakly cool sci-fi trappings. When you layer ontop of that the already gorgeous work done within Final Fantasy 14, you’re left with a truly unique experience that feels like it elevates both games.
My only gripe is, again, that some of the boss encounters feature moments where the visual cues become overwhelming and confusing. This is less of a new player issue too, as the actual mechanics of the game were largely much the same from my early impressions, but overlapping AOE signifiers and unclear communication of trigger points made certain instances slightly frustrating.

Regardless, I had a blast witnessing such high-level play and getting a glimpse at the kind of experiences only a game like this can offer players. As I said in my first play coverage, Final Fantasy 14‘s community are such a welcoming and helpful bunch that even my lack of endgame skill was helped along by a squad more than willing to always catch me when I fell.
It’s a testement to Final Fantasy 14‘s overarching gameplay systems and design choices that someone with as little experience as I have with it could hold their own in the endgame. The lessons I learnt from the early hours were still helpful to me here and despite my amused bewilderment half the time, the game was no less fun or engaging.
Along with the host of other content delivered in patch 5.3, it’s amazing to see the game and its community thriving in 2020. The Puppets’ Bunker is a wild ride to wrap up this new batch of content with and proves once again why Final Fantasy 14 is the MMO to be playing.

